
The fire pit in my mom’s backyard is probably the DIY project I am most proud of! It took a ton of convincing, a lot of time, and a lot of hard work. It may not be perfect, but it has become a family favorite activity, which is all my mom ever wanted. It’s truly become a gathering spot that now holds some of our most joyful family memories.
Not only has the pit become a family staple, but it’s also added a ton of value to the home and everyone is asking how we did it. Luckily, I’m excited to share our step-by-step process to help you build your own backyard fire pit oasis. As always, feel free to leave a comment if you have any questions or need additional information!
Contents
Prepping For The Fire Pit
Planning for your firepit is the most important step. A firepit requires a lot of prep work from budgeting to materials, to location, time, and resources. The more time you spend prepping for your fire pit, the easier the process will be. We weren’t prepared initially for how much there was to consider.
Now, with completing the entire DIY, I’ve compiled a solid list of factors to consider before beginning your backyard project.
- What is your budget? I suggest buffering in at least $500 of unexpected expenses.
- Where is the best place for your firepit? You will want to consider where to place it based on your neighbors, other backyard landscaping, accessibility, and a few other factors.
- What about gas? If you can connect to a gas line, I recommend connecting it to your home, but you can also just connect to a propane tank. Regardless either will take some planning.
- What is your desired look & where will you purchase these materials? Look up some inspiration photos and research materials because they can be a bit more difficult to find, especially if you have a lower budget.
- Consider what seating option works best. Review different options for comfort, maintenance, and durability.
- Have you researched everything? Figure out what additional tools, supplies, and other resources you will need to complete the project. It may even be beneficial to watch a youtube video or two to make sure you’re prepared.
- When do you want to do it? Find a good time of year, time in your schedule, and time of year to spend many hours working diligently outside.
Create Your Outline & Dig
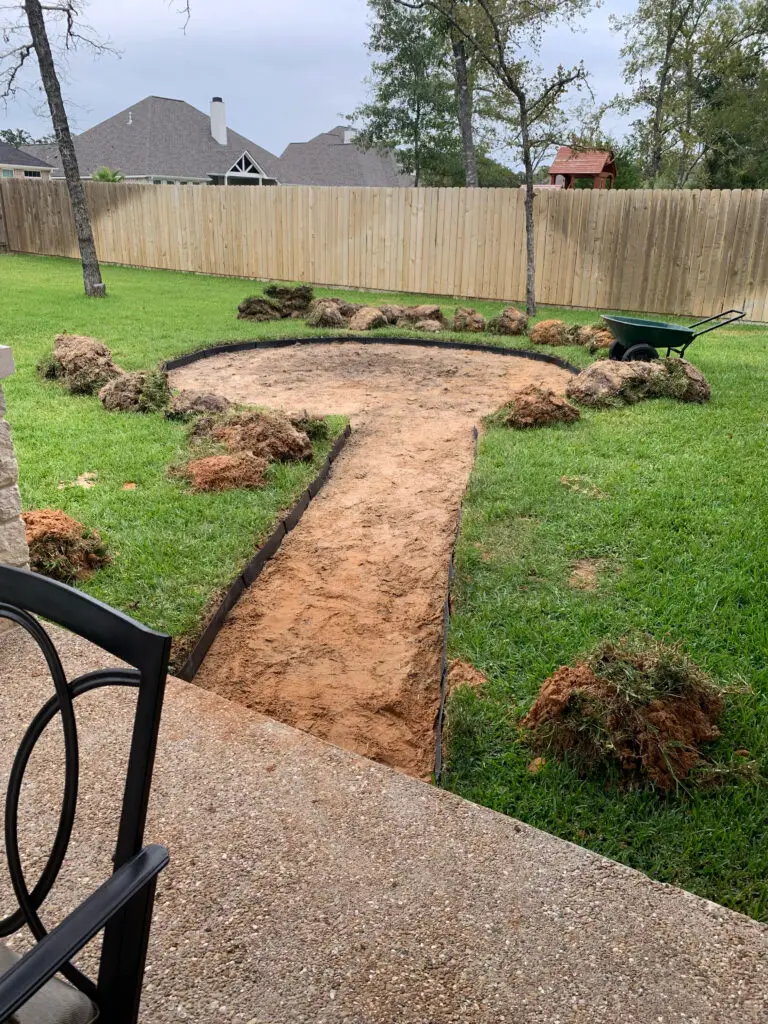
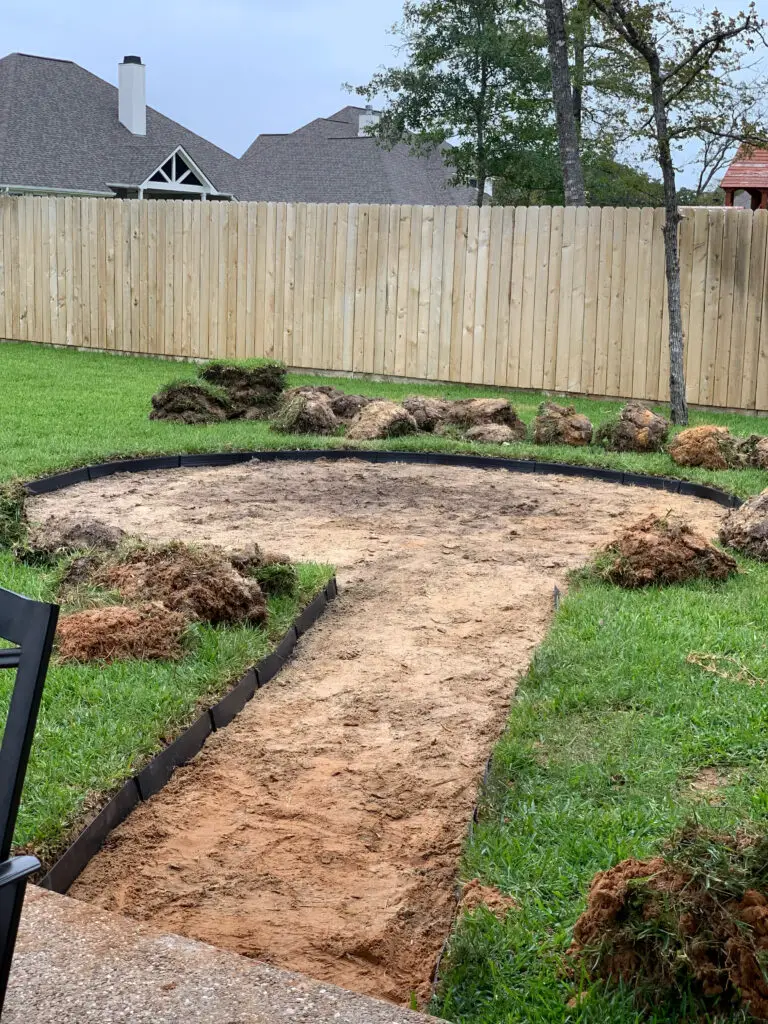
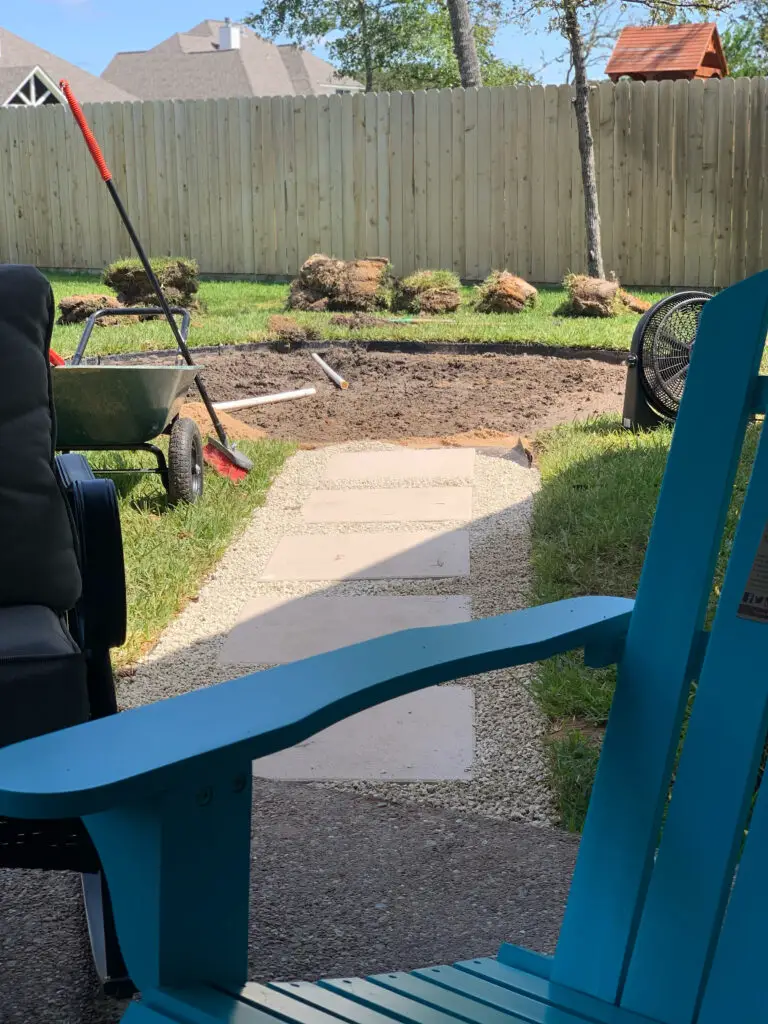
Once you’ve answered all of the above questions, start plotting out the outline for your firepit. For us, we used a chalk line and a few stakes to create a nicely traced guide for us to work with. It’s simple, affordable, and quite effective. Once your guide is placed, grab a shovel and dig down about 3-4 inches and place a stake to mark how deep you should dig.
If you dig too deep, you’ll have to pay more for materials to fill in this space later. I also highly recommend cutting the sod into small squares that you can easily roll up and toss to the side. However, make sure to transport these rolls fairly quickly or you’ll be left with splotches of sickly grass. This may be one of the more tedious bits, but you will certainly get in quite the workout!
Pro-Tip: Check The Weather
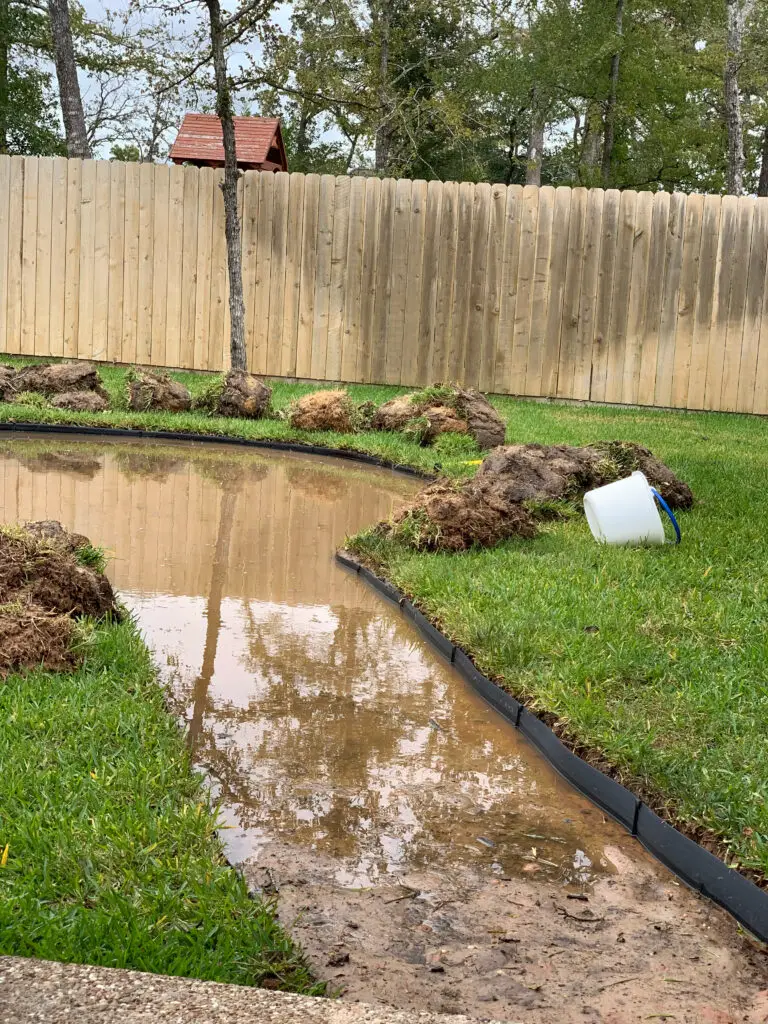
To help you avoid the costly and timely mistake we made, my one piece of advice is to keep an eye on the weather. We did not and as soon as we finished digging our outline, there was a thunderstorm that flooded all of our hard work. We had to take the time to drain all of the water out as we didn’t have enough time to let nature take its course and dry it out.
The process was miserable as the hole isn’t deep enough for an electric pump to really work, and a hand pump requires too much work and is quite inefficient. Instead, I had to resort to grabbing cups to scoop the water out very slowly. This is why I beg you to please, be smarter than I was and just check the weather!
Level & Line
Now that you dug out the entire fire pit area, it’s time to start leveling and stamping the dirt. Use rakes to help drag and even out the dirt. Once you’ve raked the entire space, go back through with a stamp to help create a firm, level surface. Additionally, if you plan to use a gas line, this is where you will want to dig a place to put your PVC pipe to run it through.
If you aren’t doing a gas line, you still need to include pipe for your gas line to the propane tank, which you will need to do now as well. This is the part I had my handyman (a.k.a. my dad) help with, so I recommend you do your research here or find a professional. Once you’ve completed the above, now is the time to lay down a nice lining material to help prevent any weeds from growing up in your nicely finished fire pit. These are easy to find and you can order large sheets to cut down to the right shape.
Add Your Rocks & Steps
Now for the most labor-intensive bit. After selecting our desired pavers and pebble rocks, we had the materials delivered and dropped off at the front of the house. The few pavers we hand carried to the back, which wasn’t bad, but they were quite heavy. Once we laid them down exactly how we wanted while managing to not crinkle up the lining below, we moved on to laying out the rocks around them. Oh, and before I forget, don’t forget to leave a nice little pebble-free area where you plan to place your pit!
This is where it got tough. You have to shovel into a pile of extremely heavy rocks, drop them in a wheelbarrow, and wheelbarrow them to the back where you then had to shovel them back out and into piles around the firepit. Once the pile of pebbles is in the firepit, you use the backside of the rake to gently spread them around the outline. My dad and I took turns raking and transporting the rocks so that neither of us got too tired. I will say that this is not for the faint of heart and you should seriously consider hiring help or spreading the workload out over several days instead of cramming it into one day like we did (as I mentioned before, we were on a tight timeline).
Let’s Get To Building!
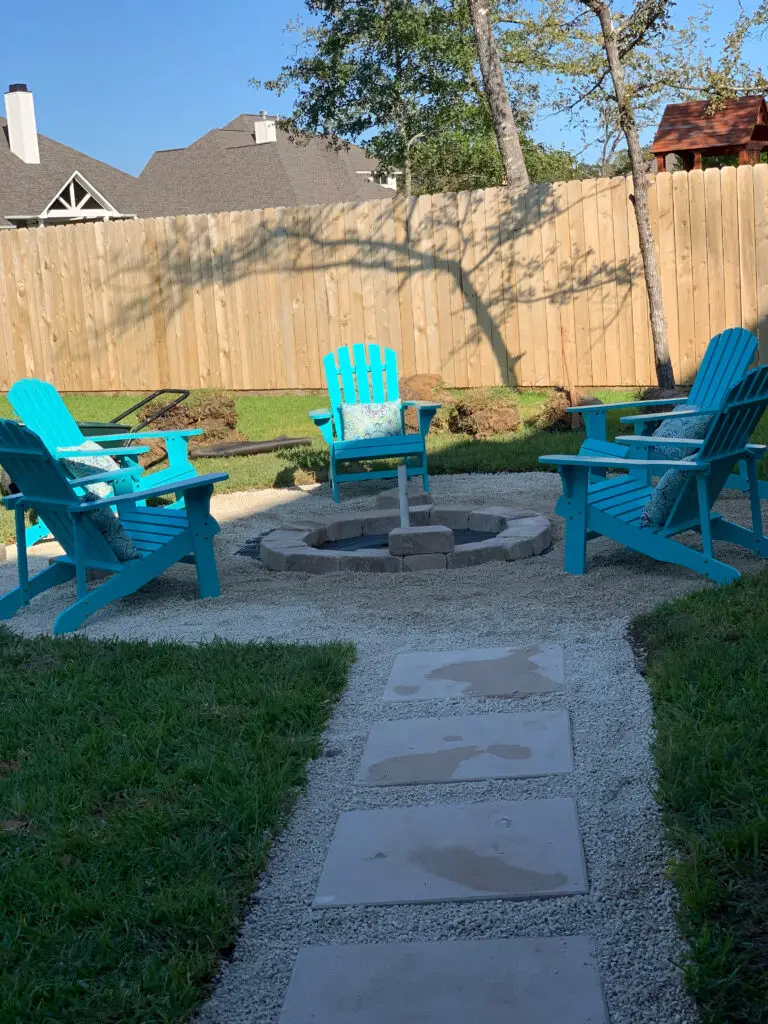
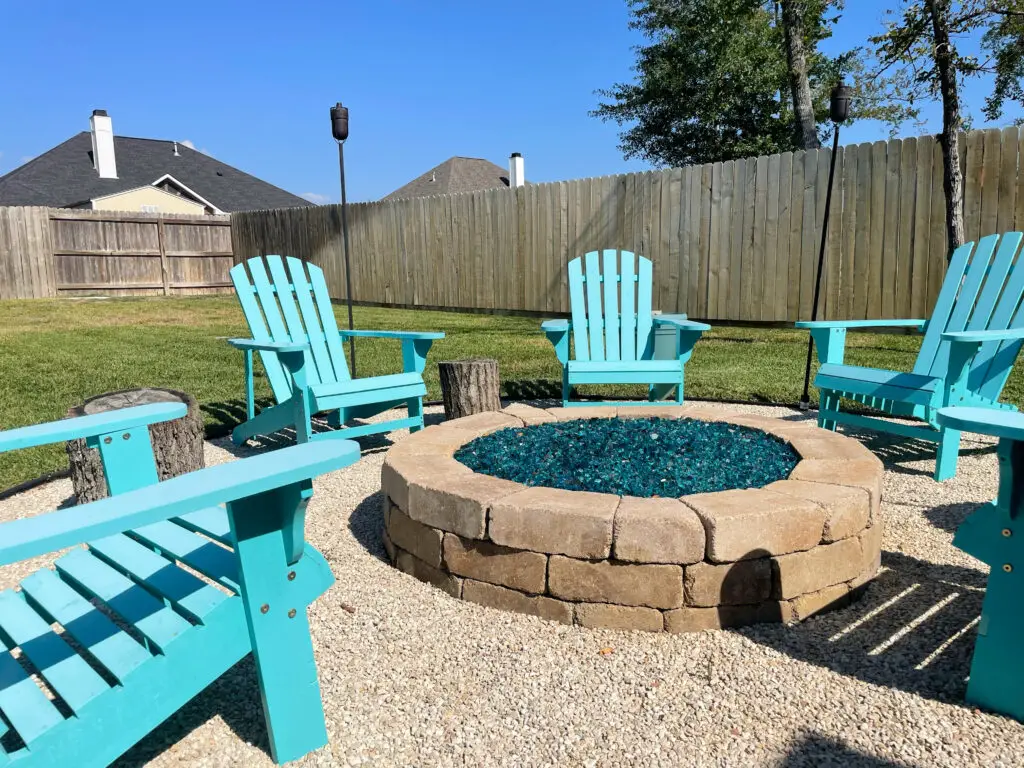
After you filled the space to your liking, evenly spread the pebbles, and left room for your firepit, it’s finally time to start building your pit! After some research, we decided to use part of a fire pit kit that included all the bits & pieces we needed including the cinder blocks. Of course, you can build yours from scratch or purchase a premade firepit if you’d rather go in one of those directions!
We quickly lined our circular base with cinder blocks and then added the pieces from the kit to the inside which included connecting the gas line. Again, I let my dad take the lead here because I felt it was best to leave it to a professional when it came to the gas line! Afterward, we filled the pit with beautiful teal fire rocks.
Time To Decorate!
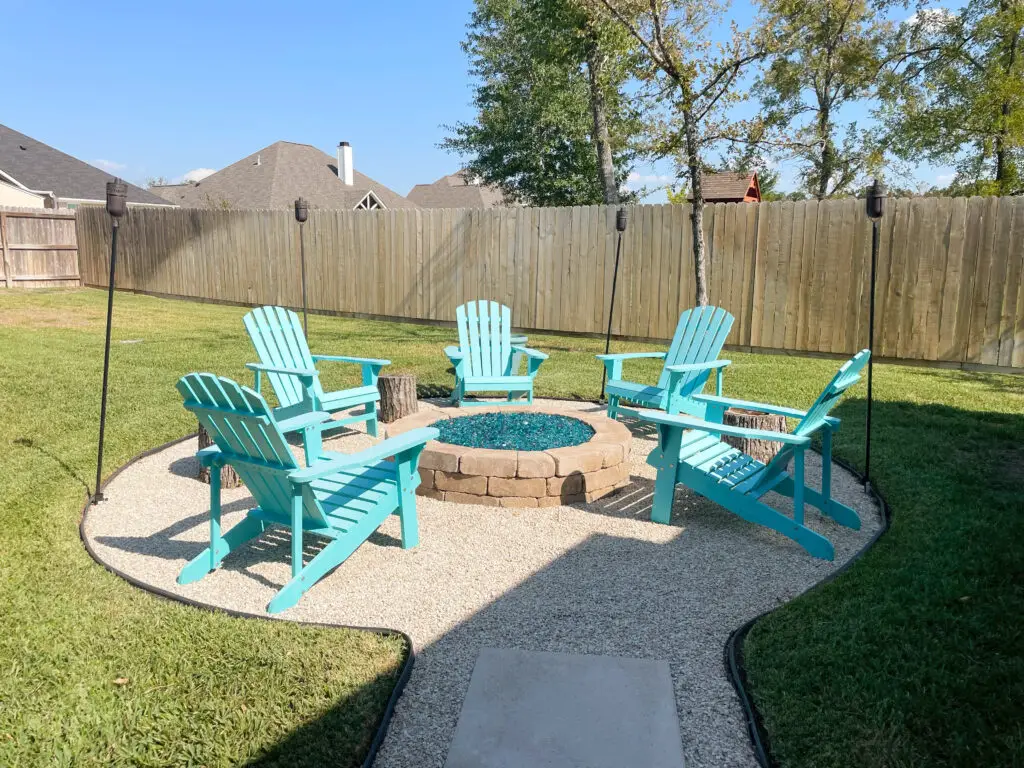
Now for the fun part – decorating! We selected these beautiful, teal Adirondack chairs to place around the pit and found a matching teal pot to hide the propane tank for our gas supply. Additionally, we added some pillows and tree stumps to place drinks or snacks on. We also added in some landscaping and a fountain, but we still have quite a lot more landscaping to do.
At the end of the day, make sure your decorations and landscaping around your DIY fire pit show your character. This is where you can go crazy and have some fun.
